© Fort Street High School Robotics
6.1 Download RobotC
To get started with RobotC, download it. Click on the blue button after you click the below blue button.
If you are stuck there are full instructions here.
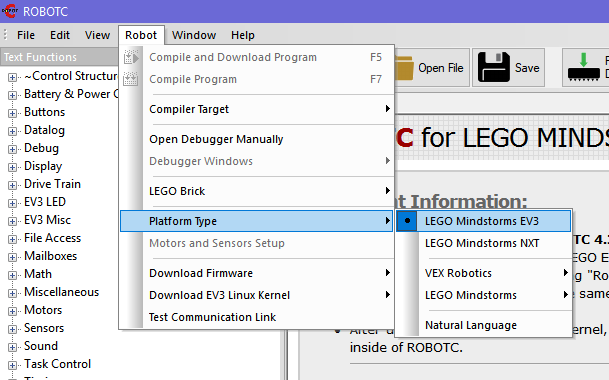
Once downloaded, make sure the following two options are selected:


6.2 Motor and Sensor Setup
- Click 'New File'.
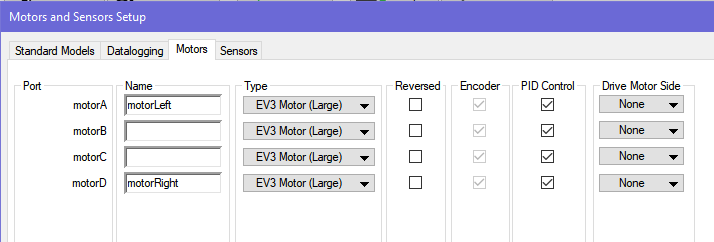
- Click 'Motor and Sensor Setup'.
- Motors have a name, a type, and can be reversed. There can be 4 motors on an EV3 brick, and 3 motors on an NXT brick. They are labelled A, B, C and D.
- Name your motors, e.g.
motorLeftandmotorRight. - Here, we plug the left into A, the right into D.
- Name your motors, e.g.

- Sensors have a name and type as well. There can be 4 sensors on both EV3 and NXT bricks.
- Name your sensors, e.g.
sensorLeftandsensorRight. Set them to beColor (EV3). - Here, we plug the left into 1, the right into 4.
- Name your sensors, e.g.

- When you click 'OK', there should be some 'automatically generated' code applied above the code. The code there should generally match what we put in the boxes above.
6.3 Introduction to colour sensors
Colour sensors return red, green and blue (RGB) values. They're like light sensors but instead of shining red/white light and measuring the reflected light, they shine red, green and blue light and measure their reflected components.
This is a lot of data to work with (you will have six variables, 3 for left sensor, 3 for right). Sometimes we add them up to get a combined 'white' value (though you will notice some colours change slower than others). You will have to experiment with this.
6.4 Don't trust your eyes!
Our eyes also do not see the same way as a colour sensor - what we say is green might not be green. So, always trust your colour sensor. (If you print a piece of paper that has a rgb(255,0,0) red square, you won't actually get a reading of 255, 0, 0 - printers usually print brighter than actual).
6.5 Sensor input
The main function is the one that will be run at the very start. Later, you might make some other functions.
Let's first try and read in the left sensor values, and then print it on the screen. To repeatedly show it on the screen, we need to surround it in a loop.
Note: you can find the functions getColorRawRGB and displayCenteredTextLine under 'Sensors' and 'Display' on the left 'Text Functions' panel. You can drag these functions into your code.
task main()
{
    int lr,lg,lb; // create the variables

    // Repeatedly do what is in the brackets
    while (true) {
        // Like scanf, input colour intensities into variables
        getColorRawRGB(sensorLeft, lr, lg, lb);

        // Print it on the 2nd line of the screen
        displayCenteredTextLine(2, "%d %d %d", lr, lg, lb);
    }
}
Here, we use two new functions:
getColorRawRGB(nDeviceIndex, pRedChannel, pGreenChannel, pBlueChannel);, wherenDeviceIndexis the name of your sensor (or S1, S2, ...)displayCenteredTextLine(nLineNumber, pChar, ...);, wherenLineNumberis the number from 1 to 8, andpChar, ...is what you would put in aprintfstatement.
6.6 More with colour
We can apply what we've learnt from if statements to do more.
What does this program do?
task main()
{
    int lr,lg,lb; // create the variables

    // Repeatedly do what is in the brackets
    while (true) {
        // Like scanf, input colour intensities into variables
        getColorRawRGB(sensorLeft, lr, lg, lb);

        // Print it on the 2nd line of the screen
        displayCenteredTextLine(2, "%d %d %d", lr, lg, lb);

        // If a particular condition is met
        if (lr > 30) {
            motor[motorLeft] = 50;
            motor[motorRight] = 0;
        }
        // Otherwise...
        else {
            motor[motorLeft] = 0;
            motor[motorRight] = 50;
        }
    }
}
6.7 Exercises
- Write a program that will make a beep whenever the sensor sees something that is very red, e.g.
red > (blue + green). Test it out on common red objects (e.g. your diary).- To make the robot brick beep, use the function
playImmediateTone(<frequency>, <duration in 10ms>), e.g.playImmediateTone(100, 10).
- To make the robot brick beep, use the function
- Write a program that will differentiate black, white and green (take a tile from the storeroom). Print these on the NXT/EV3 screen as 'black', 'white', 'green' and 'unknown'.
- To print on the screen, use the function shown above -
displayCenteredTextLine(<line>, <string>), e.g.displayCenteredTextLine(2, "black");.
- To print on the screen, use the function shown above -
- Try out line follow by following this pseudocode:
if (left is on black, right is on white) {
    turn right a bit
}
else if (left is on white, right is on black) {
    turn left a bit
}
else {
    // both are on white, or both on black
    go forward
}
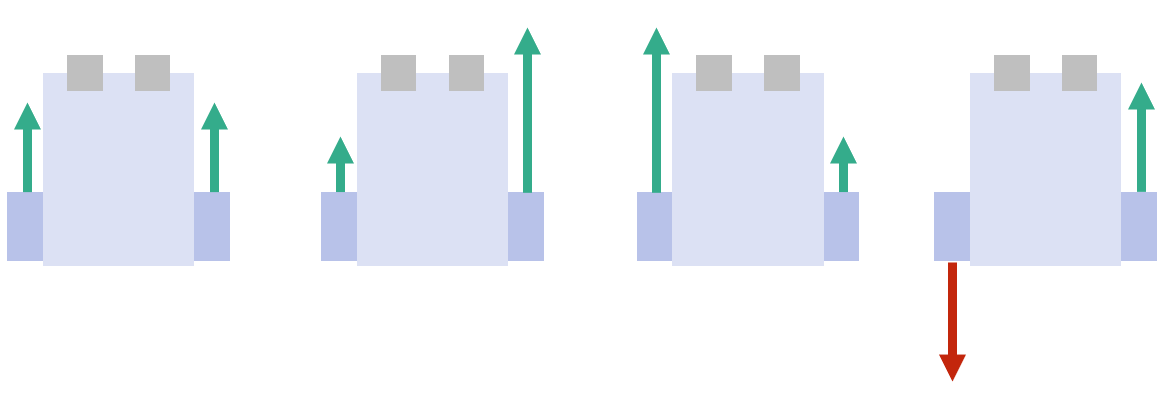
Think about which directions the robot should go in:
